


If you’re serious about being a prepared gun owner, and you’re curious about night vision, then this intro guide will cover everything you need to know to get started.
If you know nothing about night vision or why you would need it as a civilian, then you should definitely read this.
If you’re already thinking about getting into night vision, but haven’t started buying anything yet, then this will be perfect for you too because you can learn from my mistakes and save yourself some money.
And if you have already bought some equipment, or know a bit about night vision, then this will be a nice refresher course and maybe you’ll pick up some tips and tricks that I’ve gathered.
In short, no matter where you’re at, this is intended to be a one-stop guide to night vision from the prepared civilian paradigm.
Table of Contents
- newline
Why would you want night vision?
Very simply, at least half of every 24-hour period is low-light or no light. Depending on the time of year and where you live in the world, it may be even more than that.
If you want to be able to operate during those hours of darkness, then there’s really only two ways: “white light” (standard flashlights and illumination) and night vision.
The fact is, you probably don’t need to be sold on why having night vision would be a good idea, but here’s some important points…
- Huge capabilities during hours of darkness – beyond self-defense, night vision gives you the capability to do everything else at night. From bugging out, to hiking, to even driving with your lights off (obviously illegal and not recommended in normal life). In short, you gain the ability to operate more efficiently at night. If your plan is to bug out or get away if the SHTF, then doing it at night, using stealth to your advantage, is pretty valuable.
- Force multiplier – if you have to defend yourself during low light conditions, night vision gives you an incredible unfair advantage if you have it and they don’t.
- Without Night Vision you are at a disadvantage– most all LEO/MIL groups use night vision these days. To add to that, Gen 1 and cheap digital night vision devices are readily available all over the world. Most security cameras have IR illumination so they can record in the dark. Even your smartphone can pickup IR illumination. In short, night vision is now common, so it’s best to act as if you might have to defend yourself against someone using night vision against you.
In the grand scheme of striving to become a prepared gun owner, I would say that Night Vision ranks up there pretty high on the defensive side of the house once you’ve started buying guns, plenty of ammo, and you’ve invested in good training so you can actually use those guns and ammo…
Why civilians SHOULD have access to night vision
First off, for U.S. citizens, owning and using military-grade night vision is 100% legal. That’s the good news.
Next, I want to make it perfectly clear where I stand on this issue…
Some people say, “Why would a civilian need night vision?”
Huffington Post recently published an article (that I won’t link to here) titled, “Military-Grade Night Vision Gear Is Widely Available To Civilians — And That’s A Problem”
But it’s not just the anti-gun leftists, I’ve even seen many people in our gun community say the same idiotic things on social media…
To be perfectly clear where I stand on this issue… anything that is legal for the military and the police to have and use – civilians should have access to as well. Period. Full stop.
When the 2nd Amendment was written, the founders of America had just fought a revolutionary war against an oppressive government. They were only successful because ordinary civilians had access to military-grade weaponry and support gear.
So, reason #1 that civilians should have access to night vision is because it gives you all the capabilities it gives our military and police.
Reason #2 is night vision is just plain useful and a fun way to enjoy your freedom…
Reason #3 is that many, many civilians invest in and use night vision gear for hunting. Especially in fighting invasive species like wild hogs, who are mainly nocturnal, night vision and thermal tech is absolutely vital. Pretty much all the hunters in the southern states need this gear to manage wild hogs.
Now, rant over, let’s talk about…
But isn’t night vision too expensive!?
Yes, the “buy in” for night vision is not cheap. As with most things gear-related, you get what you pay for and this is especially true with night vision.
In short, night vision can require you to budget and adjust for your priorities.
Look at it this way…
If you’re a serious gun owner, like myself and others, you probably have a lot of guns. In fact, I bet most serious gun owners have a bunch of guns they never even use.
For example, if you have 3 AK-47’s and 5 AR-15’s, then you should also have night vision even if it means selling a couple of rifles. Because what you really have are eight rifles that can be used 12-hours of the day and ZERO rifles that can be used 24-hours of the day.
I totally understand and get the need to have a good fighting rifle for every member of your family, backups for your family… and even some backups “just in case” to outfit any potential good guys you may need to equip if the SHTF, or for long-term storage at a bug-out location, or whatever.
Redundancy is good. I get it.
But the fact is that a LOT of gun owners have more guns than they’ll ever use.
And most gun owners also have a bunch of impulse buy guns that they never use, or stupid guns that they really can’t justify except as a “range toy” that have no practical use, or for a million other reasons they have guns that they would be better to just sell and use that money to invest in night vision.
In my opinion, I would rather have at least one rifle I could use 24-hours of the day, appropriately setup with lasers and lights, with top of the line night vision mounted on my ballistic helmet and a handheld thermal imager … than three extra rifles that I probably won’t use and are only good 12-hours of the day.
And by the end of this guide, you’ll see why I think now is probably the best time to get your night vision setup…
What Is Night Vision?
If you want to know all the technical details about how night vision works, you can find that elsewhere.
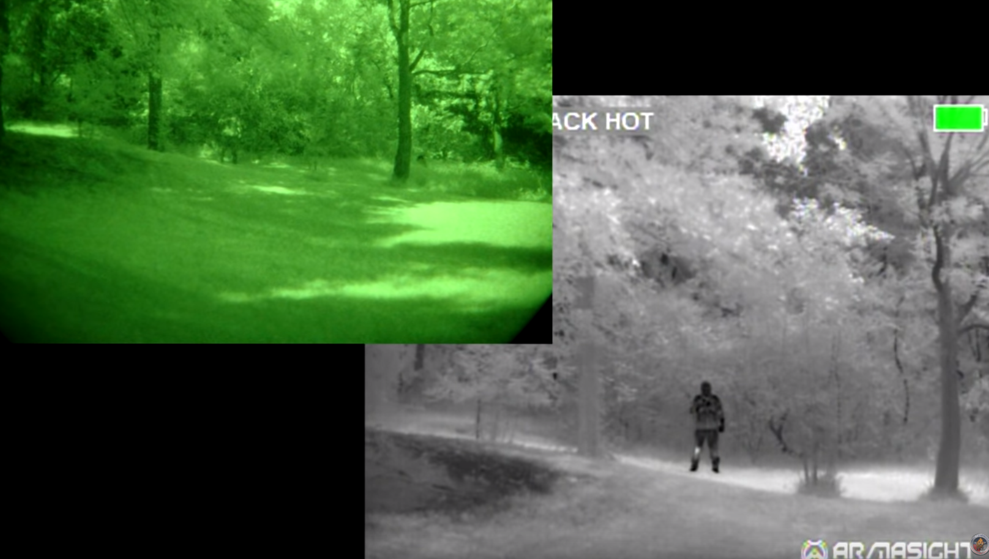
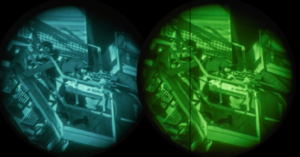
The important thing to understand is that night vision technology takes whatever ambient light there already is and amplifies it, so that you can actually see in the dark.
How well you can see with night vision depends mainly on two things:
1.) The quality of your night vision and
2.) The ambient light available (whether that’s normal “White light” or IR (infrared) light).
We’ll get to the night vision quality in a second, but it’s important to understand that ambient light still exists in what most of us would call “pitch black” conditions at night.
This ambient light comes from the stars, or the moon, or in a suburban or urban setting there could be plenty of “light pollution” from man-made lighting. For most people living in modern urban areas or suburban neighborhoods, you can walk around at night and see just fine because there’s plenty of man-made light.
In fact, there’s almost always some light at night, unless you’re operating in a truly pitch-black environment like the hull of a ship, or deep inside a building, or deep in a cave underground, with no lights on anywhere.
Digital vs “Traditional” night vision
Before we go further, there are two real “starting points” for night vision – digital and “traditional”.
In a nutshell…
Traditional night vision uses “image intensification” aka I2 technology – and I’m simplifying of course — ambient light is collected through the objective lens, sent into an image intensifier tube, where it’s amplified then it goes through a phosphor screen, and shows a much brighter picture of what you’re looking at through your eyepiece.
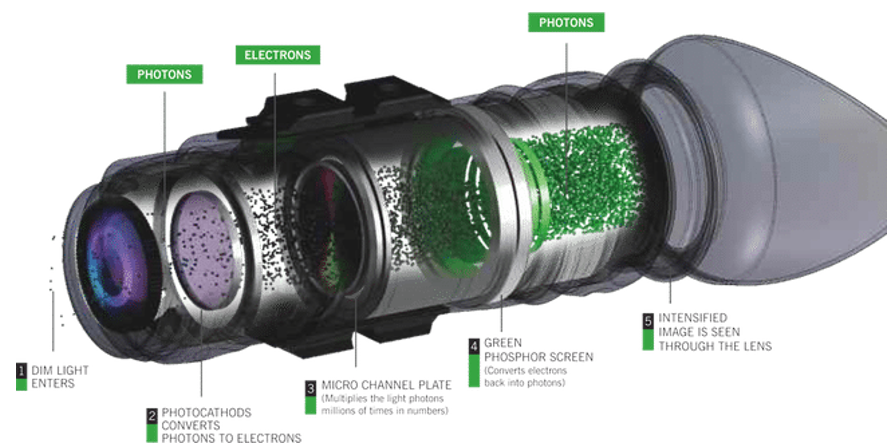
Photons from ambient light go in one end (the left) and come out the eyepiece (on the right) much brighter. That’s how the magic of night vision works, in a nutshell. Wikipedia has the full explanation here.
Digital night vision, on the other hand (again simplifying) collects the ambient light through the objective lens, but instead of this light being focused and amplified in an image intensifier tube, most devices process and convert this optical image into an electrical signal through a CCD (Charge-Coupled Device) image sensor, and that image is displayed on a type of LCD flat-panel display screen (your eyepiece).
Digital night vision has only been around the last decade or so (like most every other digital technology). And its’ the kind that’s used on cameras and the kind you will find for super cheap – only a few hundred dollars – on amazon and in your local big box store.
Currently, even the best digital night vision technology is far behind the best “traditional” night vision (gen 3+). Most digital night vision requires extra IR illumination to work well at this point.
Of course, as technology progresses, this gap will most likely narrow and eventually digital night vision will probably be what we all will be using in the future. Which is kind of good news, because the units will be smaller, cheaper, easier to produce, etc.
The video below, by T.Rex Arms actually does an excellent job explaining the gap between digital and traditional night vision:
The best digital night vision on the market today, and an example of how far the technology has come (and a preview of what the future will look like) is the Aurora SiOnyx.
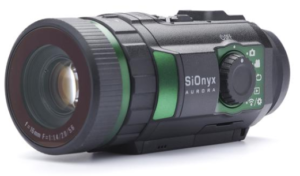
The Aurora SiOnyx is actually pretty amazing, when you compare it to the “gold standard” of entry level “traditional” night vision – the PVS-14:
- It’s about the same size and form factor as the PVS-14
- It’s about 80% LESS expensive than a PVS-14
- You can view and record night vision in COLOR (instead of just pure green or white)
The folks at T.Rex Arms have a really in depth review of this device here:
If all you want to do is observe wildlife at night, and do certain types of hunting, then digital night vision may be fine for you.
In fact, for hunters of four-legged creatures, products like the ATN X-Sight Day/Night scope are starting to get good reviews. And it’s inexpensive, even less than the price of most “good” daytime scopes.
Another cool feature of digital night vision is that you can easily record videos/pictures in most cases. Digital night vision is very similar to thermal technology in that respect, which we’ll cover in a moment…
Traditional night vision generations
When we talk about night vision quality, we start with the night vision generations…
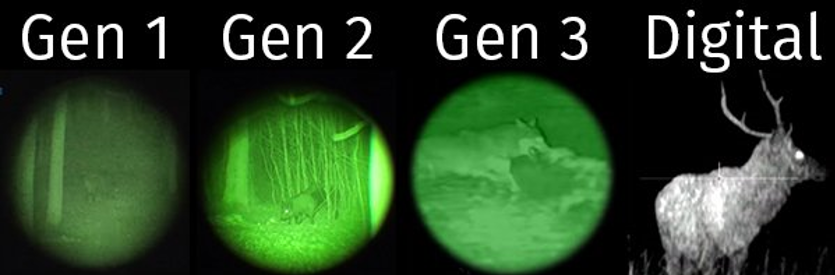
In short, stay away from Gen 1 and Digital (unless you’re hunting). Gen 2+ is usable, but Gen 3 is where you want to be.
- Gen 0 – Developed during World War II, most notable is the Nazi’s “Vampir” man-portable system. Required IR (infrared) illumination light to work.
- Gen 1 – This is the Vietnam era technology. Huge scopes called “starlight” scopes. Cheap, foreign-made night vision falls in here. You don’t want this.
- Gen 2 – Tech from the 80’s, and still usable today, though not the best resolution and cleanest images. If you’re going to pony up the cash for this, you might as well go all the way.
- Gen 3 – top of the line and is what the US military currently uses. High-end Gen 3 units are the pinnacle of technology available today.
- Gen 3+, Gen 4, etc – According to the US Army, who creates the classifications, there is no such thing as a real “Gen 4” classification. But you still see some companies use it as a marketing term.
Night Vision vs Thermal Technology.
Let’s talk a little about thermal technology because you can also use it to see stuff at night (and the day for that matter), but it’s fundamentally different than night vision technology…
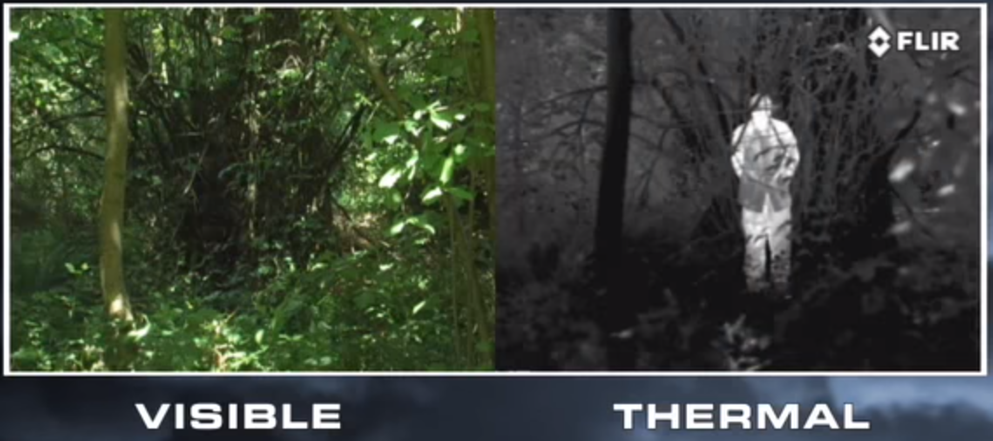
First, while night vision amplifies ambient light, thermal picks up the thermal signatures—aka the heat generated from objects—instead. This could include people, engines, the environment, anything that gives off a heat signature, thermal detects and will show you on an eyepiece similar to the way digital night vision works.
The major difference here is that night vision is best for identification and navigation and thermal is best for detection.
Here’s what that means…
For detection, aka finding living creatures, thermal is great.
You can find people and animals much faster with thermal than you can with night vision because you can pick up their heat signature no matter the lighting and weather conditions and even camouflage does not matter.
With night vision, if someone is wearing camo, hiding and being hard to detect in a tree line or bushes for example – making them hard to detect in the day time – then they’re going to be REALLY hard to see with night vision.
With thermal, you’ll still see them, even if they’re using camo and hiding in the environment.
What’s also nice about thermal is that you can use it day and night and in pretty much any type of weather and still detect living things.
For example, with night vision on a foggy night, you won’t be able to see through the fog – just like the day time. Adding IR illumination to see better pretty much makes it worse (it’s like turning on your high beams while driving in the fog, the light just reflects back at you instead of cutting through it). But with thermal, you’ll still be able to see their heat signature, even if visibility is low because of the fog.
The downside to thermal is identification and navigation…
You can see the heat signature of a person at night with thermal, but you probably can’t make out the details to see who you are looking at, you probably can’t see their facial details, if they are a threat, etc. You would need night vision to see them more clearly.
Also, you can’t really navigate the environment only seeing with thermal, you’ll need night vision to do that. So, after you see the thing you want to investigate, you’ll need night vision to see well enough to walk over and identify them.
This is because thermal only shows contrasting heat and is not going to provide the detail for you to be able to distinguish terrain features and variations as well as a night vision device.
Finally, as a general note, thermal can not see through glass. So, for example, you can’t be scanning with thermal from inside a vehicle looking through a window, or look through a window from the outside to scan inside.
(And while we’re at it – No, thermal can not see through concrete walls – like they show in bad Hollywood movies about Navy SEALs.)
In short, night vision and thermal technology are two different things and both work great at what they are designed to do. Used together, they give you the best of both worlds.
Why you do not want digital or low-quality night vision for tactical use
Digital night vision has a lot of cool things going for it, the main one being the price… it’s WAY cheaper than traditional night vision technology.
Likewise, Gen 1 technology – often found in foreign made night vision — is also very cheap. You can find both Gen 1 and digital night vision devices for as little as $199 these days.
Again, this may be a great option if you’re only hunting animals, but if you intend to use your night vision for any tactical applications, you do not want digital or gen 1 tech because both of these lower-quality night vision devices require IR illumination to be truly usable.
Remember, night vision only amplifies ambient light. So, if your night vision is lower quality or very little ambient light, you have to use IR illumination which is on the infrared spectrum, meaning it’s invisible to the naked eye, but clearly seen through night vision.
Which of course means, if you have to use IR illumination all the time, in order to see in the dark with your low-quality night vision – then anyone using night vision can see your IR light. Heck, anyone else with a smartphone will be able to see your IR light.
Because you NEED extra IR illumination to be able to effectively use gen 1 or digital night vision, it’s like walking around with a high-powered flashlight on at night – attached to your head – for anyone else with night vision.
So, when it comes to night vision for tactical use – buy the best you can get.
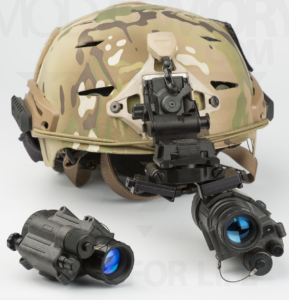
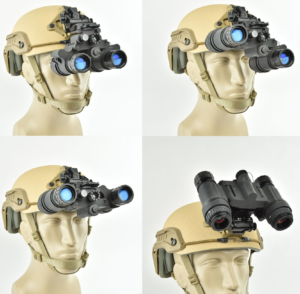
Why you want to “head mount” your night vision
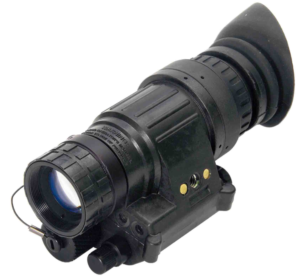
An important point is that there are night vision scopes that fit on rifles, and then there are hand-held monoculars like the PVS-14 that can also be weapon-mounted…
But, you almost never want to weapon-mount your night vision.
You really want to mount your night vision on your head in most situations, for a few reasons…
One, so you can see in the dark enough to be able to navigate. Where your head and eyes turn, that’s where you want your night vision.
With night vision, you only get a 40-degree field of view, which makes it hard enough to see your environment. If you had your night vision rifle-mounted, you’d have to hold the rifle up to see where you’re going and that would get tiring really fast and further reduce your situational awareness.
Two, if your night vision is weapon-mounted, then you have to point a weapon at anything you want to look at, violating a fundamental firearm safety rule. If you’re operating with a team or even just one buddy, you’d have to point your gun at them to see them. Stupid.
In short, about the only time you want weapon-mounted night vision is if you are a hunter setup in a blind, and don’t intend on moving around, or doing practically the same thing in a tactical situation by acting as a “sniper” in a support or overwatch role with a rifle.
Your 3 options for wearing night vision on your head
When it comes to head-mounting your night vision, you only have a few options…
- Non-helmet options: The PVS-14 comes with a head mount that’s also called a “skull crusher”, because most people hate using it. That said, it’s an included accessory that works. But there are a few other options in this category these days such as the Crye Precision NightCap. These are probably the cheapest and lightest options.
- Ballistic helmets – are rated to offer various levels of ballistic protection. Most I’ve seen are only rated to stop pistol rounds, though from talking to a few military guys, they feel good about the fact that most rifle rounds (specifically the 7.62×39 common to America’s enemies) have lost enough velocity after several hundred yards that these helmets have a good chance of stopping it. These days, most ballistic helmets are designed to support night vision with built-in mounts and rails for accessories, etc. So, ballistic is great, the only downside would be added cost and weight for the bullet protection.
- Bump helmets – are the lightest and cheapest options for helmets. You can typically find the exact same versions of ballistic helmets offered as a “bump” helmet (only protects against impact, not bullets). These also typically have “vents” or holes in them, so they can be less hot to wear. They’re typically very light compared to ballistic helmets and much cheaper too.
Here, it really depends on what you think you need for what you’re trying to accomplish and what your budget will allow.
If your primary use is hunting, for example, you probably don’t have to worry about the animals shooting back at you, so a bump helmet or even a NightCap may be the best choice.
Which is best? Binocular vs monocular, dual tubes, single tubes and more
There are two basic roads you can take with night vision, monocular vs binocular units.
And it seems everyone has a passionate opinion on what is best and why. The truth is that they both have advantages and disadvantages and binoculars are not automatically “better” than monocular systems just because they cost more and are in use by special operations forces.
The most common example of a monocular system is the PVS-14:
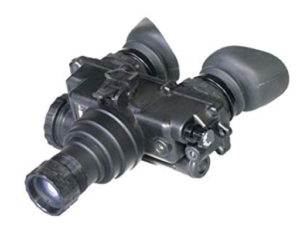
The most common single-tube binocular system is the PVS-7:
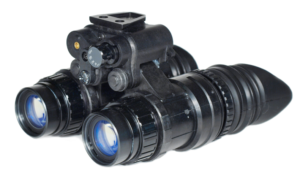
The most common binocular dual-tube system is the PVS-15:
First, let’s bust some myths…
It’s a myth that binoculars give you better depth perception. The truth is you don’t actually gain any depth perception, but for most people – who have no practice with night vision – it’s easier to navigate when both eyes are receiving the same information. So, it’s kind of like “placebo effect” depth perception.
It’s a myth that binoculars give you a “double” field of view. The truth is that binoculars still only give you a – roughly – 40-degree field of view, the same as the monocular (I believe it’s technically 40-degrees plus the inch or two between your eyes, but the point is it’s not double the field of view).
The short answer as to which to get is that it depends on your mission and objectives with night vision…
If you’re operating in completely dark environments like the middle of Afghanistan or remote, pitch-black rural areas with very little ambient light, then you might benefit from a binocular system. You don’t have to worry so much about lighting conditions giving away your position…
On the other hand, in suburban or urban areas where there is lots of light pollution, it’s going to be very important to be able to read lighting conditions quickly and avoid lighted areas. A monocular system, because only one eye is covered, will allow you to do that the fastest.
That’s one of the “problems” with binocular systems, because both eyes are under night vision, it can be harder to read the lighting conditions around you. While you can mitigate this with training and by doing things like running the dual-tubes high on your eyes (making them easier to see under if needed) and extended a little more from your eyes (giving you just a little more peripheral vision), the fact remains that even on the lowest gain setting, with binos, both eyes are adapted to the intense night vision light in a dark environment.
With a monocular system, you have one eye that is unaided and becomes adapted to the night and lighting conditions around you. If you want to read lighting conditions further, you can simply close the aided eye if needed. If you go from complete darkness to entering a brightly lit room, then you have the one eye to use that’s ready for the light while you take the time to flip up your night vision.
On the other hand, a dual-tube setup is going to be easier to use for almost everybody. Especially if you have no practice running night vision because you are seeing the same way you see during the day (with both eyes). That said, with practice, you can get used to running a monocular and be just as effective at night.
When we get to recommended gear, you’ll see that some of the most modern dual-tube night vision setups often allow you to rotate one tube up and away from your eye, giving you the ability to use them as a binocular or monocular setup due to your preference. If you have the money, this is probably the best all-around “ideal” solution because you can adapt it to whatever you need. You can switch between a dual-tube or monocular setup on the fly.
One thing that most people will agree with is that a binocular system, but with a single tube like the PVS-7 gives you none of the advantages of a single-tube monocular system and all of the disadvantages of a binocular system. If it’s all you can get, it’s of course usable, but it’s a 30-yr old design and there’s a reason that modern binocular systems use dual tubes. For that reason, we’ll only focus on dual tube binocular vs single tube monocular setups here.
Why you should probably start with a PVS-14 first.
Unless you already know you need dual tube night vision, then it’s probably a good idea to start with a single monocular PVS-14.
Here’s why…
First is the cost. It’s going to be about half as expensive to get one PVS-14 then to get a dual-tube setup.
Second, you still have great capabilities. You can run it in rural or urban environments, and you can operate just fine.
Plus, you’ll have one eye that’s always adapted to the lighting conditions you’re operating in, which may actually be very important in your area if you live in on near urban areas that are brighter at night.
Third, it’s very versatile. You can use it in just your hand (like scanning) or put it in your get home bag/bug out bag, or you can mount it to your helmet, or even mount it to your weapon. So, it’s pretty versatile for many different uses.
In short, if you are just trying to prepare for SHTF and want to “check the box” to get your night vision gear squared away, then a PVS-14 is exactly what you need.
Also, it’s worth noting, that in the future if you decide you want a dual tube setup, you have a couple options – besides just buying a separate dual tube setup — if you start with a single PVS-14…
You could simply buy another PVS-14 as your budget allows and buy a bridge mount like the ones offered by Integrated Components to go with it to give you a dual tube setup, using two PVS-14’s.
While this will be heavier than a modern, purpose-built dual tube setup, with some other potential downsides, there are some advantages as well…
One thing I like about this setup is that you can use the dual-PVS-14’s when you’re by yourself, but if your partner or spouse needs night vision, you can switch back to a monocular setup and hand your other PVS-14 to a partner who does not have night vision, so you can both benefit.
Finally, there are also companies that can convert your two PVS-14’s into a true dual tube setup with lighter-weight housings, etc in the future if you feel the need to do that. They simply take the “guts” (image intensifier tubes) and glass and optics from inside the PVS-14 housing and stick them into the appropriate lighter-weight dual-tube housing, making them a permanent dual-tube set of goggles.
It may be also easier to budget your night vision purchases this way, because you can start with a single PVS-14 monocular setup and get yourself going and in the future buy another PVS-14 as your budget allows… and if you decide to turn them into a true dual-tube setup, you can send them out to have the tubes installed n the proper dual-tube housing, or you can just buy a bridge mount to retain the ability to switch between dual-tubes for yourself or a monocular setup for two people.
A brief and total beginner’s guide to using night vision
We’ll talk about the best gear and places to buy your gear in a moment, but let’s cover how to use it first.
The process for getting started is the same with a monocular or binocular setup, so these instructions for a PVS-14 are basically the same with a dual tube setup.
You’re going to have it helmet mounted, so the first thing is to put it over your non-dominant eye. This makes it easier to mount your rifle later. Then, you’re going to turn it on. If you’re doing this during the daytime, go ahead and keep the daytime light filter cap on.
Then you’ll want to adjust your mount so that you get the best “picture” possible. What you’re looking for is as close to a perfect green or white “circle” as you can get with the picture. So, adjust the mount attached to your helmet to move the PVS-14 up, down, and side to side until you get it where you want it. If you’re running the eye cup on your PVS-14, you’ll move it back until it slightly covers your eye, or touches your eye protection.
Then, set your gain. Near the front of the unit, next to the battery compartment is a gain adjustment for adjusting the amount of brightness. Adjust it so that you’re not blinded but can see comfortably.
Then, you’re going to focus it. There are a few schools of thought here, but probably the easiest is to start with an infinity focus if you’re outdoors (or the farthest you can see indoors). It’s a two-step process, the way you get your focus is to look up at the stars if you’re outside and adjust the objective lens (outer focus ring, furthest from your face), first. Make the stars look as clear as you can with just that focus ring first. Once you do that, then adjust the diopter focus ring that’s right next to your face to make it even more clear when looking at the star. Then, if needed, go back to the outer ring and make any fine-tuned adjustments for clarity.
Now, you should be good to go…
Keep in mind, the trade off with night vision is that you can only have it focused at one distance. That’s why we focus far away, because we can see everything far away with greater clarity, but the closer we get to objects the less focused they are. For example, you won’t be able to see your hands or rifle under night vision clearly if you’re focused on far away.
How to increase your situational awareness under night vision
Besides your night vision only being truly focused on one specific point, the other thing that makes it hard to operate with is your field-of-view is greatly reduced (imagine looking through a “toilet paper tube”).
You only have about a 40-degree field of view with night vision (again, this is true even with a dual tube binocular setup). Meaning you lose much of the peripheral awareness that you have in normal daytime conditions with your eyes.
You also lose a lot of depth perception.
The answer to all this is to “keep your head on a swivel” as the saying goes.
You should constantly be scanning to take in as much info as you can from the night vision…
Using a “triangle” pattern by looking up left, up right, then down to try and get a snap picture of your environment works well.
Just keep your head moving and relax, trying to take in as much information as you can. For many people, myself included, when it gets really dark and you only have a small bit of visibility it can become easy to get claustrophobic and uncomfortable.
Just relax, and keep scanning.
How to move like a ninja under night vision
Moving and navigating around with night vision is a whole new experience.
Again, you have such a reduced field of vision and peripheral awareness, that you might be tempted to stare at your feet.
Don’t do that.
Again, keep your head up on a swivel, and take in as much visual information as you can. Up left, up right, down in front of you where you’re walking, up left, up right, scanning…
But, the real key here is to move SLOW.
You want to slow down, and walk carefully. Use your feet to “test” each step before committing to it.
You need to get good at this anyways, because one of the primary reasons to use night vision is so that you can have the benefits of stealth and surprise on your side.
In short, you cannot move fast and also be stealthy. So slow down and walk more carefully.
Probably the easiest way to get comfortable with moving and using your night vision is to put it on and do the normal stuff you do at night, but without lights. Walk through your house using it.
Then go for a walk in your yard and practice walking up stairs, around obstacles, through your grass, etc. Take the dog for a walk, whatever.
Then you can go on short hikes in unfamiliar terrain, and keep practicing in different, more challenging environments.
It is absolutely true that the more you use your night vision the more comfortable you will be using it.
How to shoot your rifle under night vision
Shooting a rifle with night vision is a lot like shooting your rifle normally, but you’re not going to be able to get a cheek weld and look through your sights and/or optics like normal.
That’s because there’s night vision hanging off your face.
That said, you want to use the same fundamentals of marksmanship with your stance and mount the rifle up so that you can control recoil better and utilize as much of your natural point of aim/index as possible.
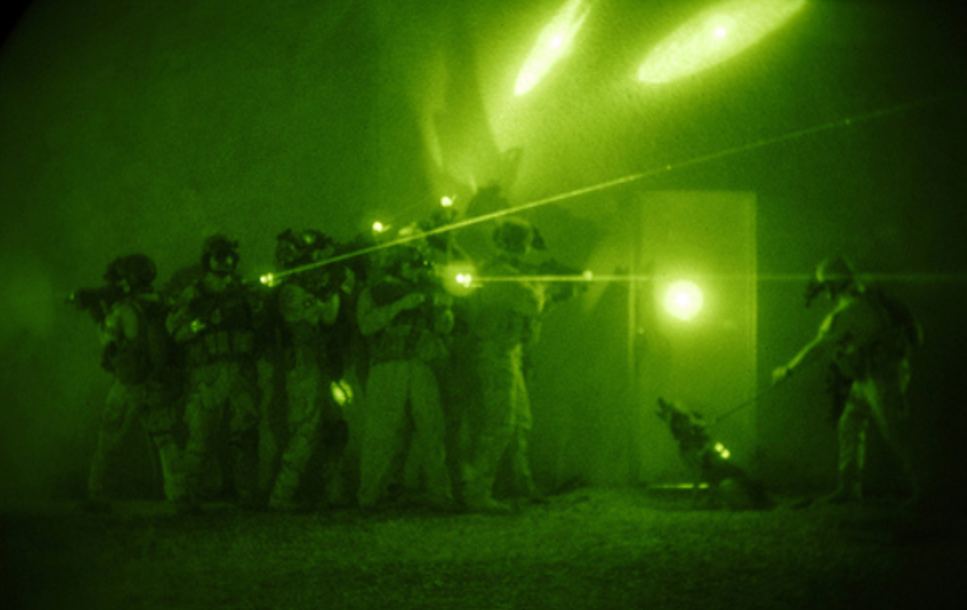
The most common way to shoot rifles with night vision is by using an IR (infrared) laser.
This is a laser that, instead of a red or green dot, puts an infrared dot on your target. That means that only people with night vision can see it because it’s invisible to the naked eye.
So, if you see a threat, you mount the rifle – utilizing the index you’ve built through your normal rifle practice – and then turn on your laser to point the dot on what you want to hit. Then take the shot.
When you’re done shooting, you turn the laser off.
You do NOT walk around with the laser on, like you see in the movies, because – again – anyone with night vision can see the laser. It would be like fighting at night with a white light and walking around with it on – you’re giving the bad guy a bullet magnet to shoot at if he has night vision capabilities.
The best IR lasers will also have an IR illuminator built in. This way you can get positive target identification before you take the shot, and the illumination also helps to reduce any “blooming” effect from the power of the IR laser.
How to zero your IR laser
There are two ways to zero your IR laser on your rifle…
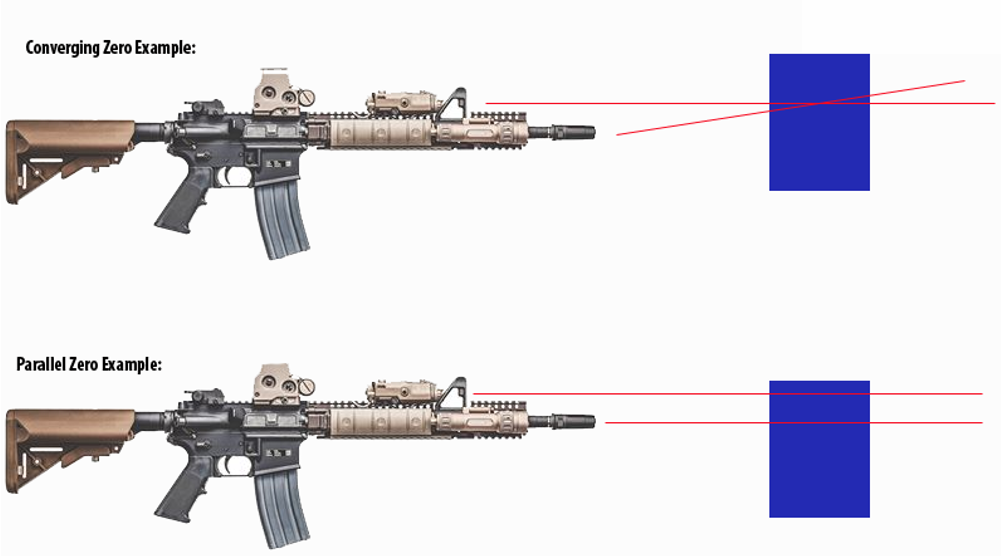
The first is a converging zero. You simply zero the laser to point of aim = point of impact at wherever your red dot or optic is zeroed. So, for example, if you were using a 50/200 combat zero on your optic, you would zero your IR laser at 50 yards to be point of aim vs point of impact.
With a red dot, like an EoTech, it’s simple. Look aim at a target roughly 50yds away and adjust your laser so that it’s on the same spot as your red dot. Simple.
The problem with the converging zero is that your IR laser is a laser – meaning it goes in a straight line for infinity. So, past that point of aim/point of impact zero point (50 yds) the laser would cross the path of your bullet and keep going… meaning that your laser would not be an accurate way to target past your confirmed zero points.
Still, if you know you’re only going to be shooting about 100yds or in (which, realistically is probably the furthest you’re going to be able to positively ID anything at night well enough to be shooting at it) – then a converging zero is a quick way to zero. If you have a red dot that’s already zeroed on your rifle, then it’s an easy process to just line the laser up with your red dot at the furthest distance you intend to shoot.
The other way to zero your laser, and the one that’s recommended, is a parallel zero. That means, wherever your laser is mounted on the rail – the laser beam goes in straight line for infinity parallel to your regular optic zero.
That way it never changes no matter how far away you’re shooting.
You just have to keep in mind that your bullet is not going to hit exactly where you’re aiming but slightly to the side (aka parallel) of the laser point. But that offset will be consistent across all distances.
To get a good parallel zero, you’ll want to use something like the Telluric Group IR laser zero targets. You’ll also have to make sure you get the right target based on what IR laser you’re using and also how you’re mounting it (top rail or side rail, etc).
There are certainly other “do-it-yourself” ways to zero your IR laser without buying this target, but the targets are pretty inexpensive for what they are and they’re worth the cost in my experience. You can search online for other “do-it-yourself” methods if need be.
How to shoot your pistol under night vision
Shooting your pistol under night vision is just like shooting it without night vision except that you’re not going to be able to see your sights clearly!
Instead, because of the far focus of your night vision, you’re going to be threat focusing and your handgun sights will be very, very blurry. Actually your entire gun is going to be blurry.
Keep in mind, if you are well trained with your handgun, then for most good shooters – from about 5yds and in – you can “point shoot” based on your index and get decent hits on a man-sized target. Given that your handgun is probably a last-ditch “emergency” response if you’re shooting under night vision, that might be all you need.
That said, let’s talk about the options here…
Option 1: Tritium Night Sights: The good news is that you can use your basic tritium night sights, like the Trijicon HD night sights I use and have recommended before.
The bad news is that it can take some getting use to because you’re basically only going to see three “blobs” of light where the tritium glows under night vision.
Depending on how your eyes work, if using a PVS-14, some people can see the sights with their unaided eye, and see the target with the Night Vision eye, and superimpose the two on each other. That doesn’t work for me… and the only way I could focus correctly was to close my non-aided eye and shoot with the blobs under night vision.
You’ll have to test and see…
With three dot tritium sights, it can be kind of confusing which “blob” is the front sight… Because of this, I have heard good things from others with more experience that myself, that using a 2-dot style tritium sight (put the front dot over the rear dot) is a solution to this.
Either way, if you have enough training with your handgun in the day time to have developed a proper index (you look at something and can draw your gun to that point and the sights are almost perfectly aligned on the target spot you were looking at) – then your trained index and the blobs can get you pretty far.
Option 2: Miniature Red Dot Optic Sights: I don’t yet have experience doing this, but probably the easiest sighting solution on your handgun is a red-dot optic from what I’ve seen.
The best handgun RMR is arguably the Trijicon RMR.
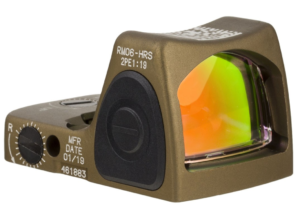
With a red dot on your handgun, much like a rifle, it simplifies things because you don’t have to line up your front and rear sight. You just look at your target with the night vision, draw to the target using your index, look for the dot to float in front of your point of aim and shoot.
Option 3: IR aiming laser. Using a laser is an option for your pistol, just like your rifle.
You could simply take whatever your daytime handgun setup is and attach an IR laser to it, on the rail that’s under most modern handguns.
Two examples are the Surefire X400V IRc and the DBAL-PL.
The downside is that you might have trouble finding a holster solution to fit your light/laser equipped handgun. And it’s probably a little less intuitive to use a laser on your pistol to shoot with compared to a red dot style sight.
Also, the miniature red dot optic can be used during the daytime hours just as easily as nighttime, whereas an IR laser can only be used with night vision (something to be aware of).
Option 4: White light on pistol, any sights. The final option is a compromise of sorts…
You could argue that because you would only draw your handgun in an emergency while using night vision, that the time for stealth has long past, and you could just put a weapon mounted light on the bottom of your handgun and then you just draw, activate the light and use your iron sights like in the daytime.
The benefit of course, is you can use any sighting system you’d use in the day time (any iron sights will work, including fiber optic sights with no tritium, etc). The downside of course is that you have to use white light and give up your position.
Two “Best Practice” Night Vision Tips To Protect Your Investment:
Before I get to the recommended gear below, I just wanted to give you a few more tips for being a night vision owner to protect your investment…
1. Store your night vision device with no battery inside.
You do NOT want to ruin your expensive electronic night vision gear by leaving your batteries inside it and the battery leaks and kills it. That would suck to lose thousands of dollars of night vision equipment because of .60 cent failed battery. The easy solution is to take the battery out when you’re not using it and store it that way. (This would also prevent your device from getting accidentally turned on during transport or something of that nature and draining the battery that way too).
2. Tie down all of your night vision gear.
When mounting your night vision gear to your head, you want to secure it with a lanyard type system. You can use the simple 550 paracord that comes with a PVS-14 for example, or you can buy a purpose-made device like the Wilcox retractable lanyard or the T.Rex Arms SBL NVG Lanyard which is a slick, simple design utilizing shock cord and Velcro that also features built-in battery storage.
Many helmets also feature built-in bungee tie downs to stabilize your night vision and tie it down too. Also, you want to zip tie your laser device to your rifle handguard in addition to mounting it using the supplied mount. Redundancy is good here! Again, losing thousands of dollars in night vision gear and/or lasers because you dropped it would suck.
The Best Night Vision Gear
Now, we’re going to get more in depth with gear choices and my recommendations.
Keep in mind, my perspective is one of an American citizen concerned with preparing for tactical situations with the worst-case being a SHTF or WROL situation – aka a Prepared Gun Owner.
That said, my secondary perspective is being able to use the same gear for hunting and other night-time adventures.
Let’s get started…
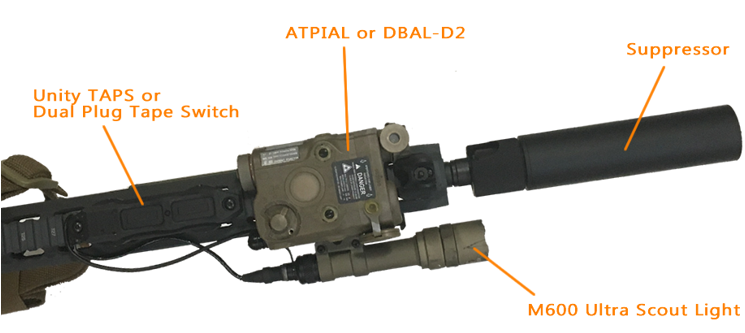
The recommended “Prepared Gun Owner Night Fighter” kit.
I’ll start with the recommended basic setup, then we’ll get into details on the individual parts of the kit, why they were chosen, the other options to consider on the market, and – if applicable – “deluxe” options you can upgrade to if you have desire and/or money.
Keep in mind, with this loadout, you will be fully capable at night time, while not taking away any capabilities during the day.
Ballistic Helmet – my recommendation is an Ops Core style, high-cut ballistic helmet.
Night Vision – PVS-14 – Gen 3, HP+, green phosphor night vision
Rifle IR (Infared) Aiming Laser – ATPIAL-C – infrared aiming laser
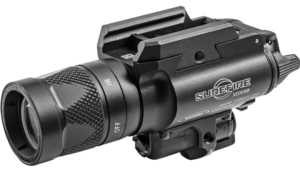
Rifle White Light – Surefire Scout M600DF – weapon mounted white light
Surefire dual pressure switch – for instant switching between laser/IR light and white light.
Pistol Night Sights – Trijicon HD or HD xr Night sights – for your handgun
Handheld Thermal – FLIR Scout – for infrared scanning and detecting
Recommended Gear, Upgrades and Options
Now, let’s talk about each individual piece of kit, why I chose what I did, the other options on the market and how to figure out what’s best for you.
The 3 Keys To Head-Mounting Your Night Vision
There are three components to mounting night vision to your head…
1. Helmet and other head-mounted solutions.
First off, about the only time I would wear a helmet is if I was putting on night vision.
For many people, a simple “bump” helmet is all they need to mount their night vision. If that’s you, and you don’t think your helmet needs the ability to stop bullets, then any of the Ops Core or Team Wendy style bump helmets should work fine.
For me, I knew that I would be taking tactical night vision training classes. That means other people would be using guns around me with night vision too. That means I want to wear body armor and a ballistic helmet in case someone makes a mistake (and many CQB classes require this anyways).
Finally, I felt that if I had to wear a helmet, it might as well be ballistic anyways.
You have options when it comes to ballistic helmets…
First is the standard ACH style helmet with NV mounts. These are the cheapest option and you can find them online in many places. You get the Level IIIA ballistic protection you want and they’ve been proven for years in our military.
The thing I don’t like about the ACH is, for me and my Howard Leight ear protection, it did not fit comfortably underneath the helmet. Plus, I got the idea that I wanted to put rails on the side of my helmet, and maybe attach some ear pro permanently to the helmet… Your mileage may vary, but I ended up moving to a “high cut” design helmet.
I chose the Ops Core/Gentex TBH-II Mission Configurable Helmet System. This is on the low-end of price for what a genuine high-cut ballistic helmet would cost.
Finally, we have the Night Cap option, if you just don’t need a helmet at all…
I think the best choice here is the Crye Precision Night Cap…
Prices accurate at time of writing
Besides the Crye NightCap, most all of the other “non helmet” options are about the same price as a good bump helmet… so I think the Crye gear has a lot going for it. It’s worth noting though, that you’ll have to install a night vision shroud into the Crye NightCap before using it.
I’ve also seen reports online where guys like The Crye NightCap because it’s super low profile (you can wear a boonie hat over top of it). And it folds down super small. With something like this, you could fold it up and stick it and your PVS-14 in a smaller bug-out or get-home bag (whereas a helmet, believe it or not, takes up a lot of room in a bag!). It can even pack down small enough you could stuff it in a large pocket like a cargo pocket.
There are other “Night Cap” style offerings, but I don’t have experience with them. Wilcox has one, along with First Spear, to name a few. Again, I think most all of the others except the Crye NightCap are about the same price as the best bump helmets, so it’s probably better just to get a bump helmet at that point…
It’s up to you which one works best for your needs.
2. Shroud options
This is the bracket, shaped like a rectangle in the center, that your mount will attach to.
On the ACH helmet, there is one hole that a Norotos NVG shroud attaches to shown below. Of note, if you buy a military issue ACH helmet like the one recommended on this page, it should come with this shroud already:
And on the newer style Ops-Core and Team Wendy helmets, there is a Wilcox NVG shroud either built in or attached – these are also commonly called a “three-hole shroud”:
3. Flip Mounts and Mount interfaces
Now that you have a helmet with a NVG-shroud, you need to attach your Night Vision to it…
First up is a USGI J-arm that’s attached to your PVS-14 or other night vision device. This is the standard military issue bayonet style device that slides into a standard military issue Norotos Rhino mount.
That’s the entire basic setup: a USGI J-Arm for your PVS-14 that attaches to your standard issue USGI Rhino Mount. This is also the cheapest setup.
Then there are dovetail style mounts, which are usually found on dual-tube systems, but you can upgrade your monocular with them too.
While I don’t have personal experience with them, I’m told these tend to be a little more stable. They can also be thought of as an upgrade to the PVS-14 J-arm interface.
There are also “ball mount” systems, but they’re not as common…
Honestly, I’m using a very same basic setup:
- Wilcox 3-hole shroud that came on the high-cut helmet
- Standard USGI J-arm on the PVS-14
- Standard USGI Norotos Rhino Mount
Which seems to work fine thus far. I completed a 3-day night vision class with no problems. I’ve also gone on plenty of nocturnal “nature walks” on my own time to practice.
However, you may hate the way it fits. Because of the differences in people’s faces, certain mounts may work better for certain people. If you want to upgrade your mounts, then the first most popular upgrade is the Wilcox L4 G-11 mount.
It’s supposed to be a little more stable, yet it fits your standard USGI J-arm bayonet interface. Another reason people like this is because the release for your J-arm is not in the same spot as the standard Norotos mount, which can be accidentally hit when you go to flip your night vision up or down sometimes.
The next step from here is to upgrade your J-arm to a Wilcox dovetail mount and then you upgrade your mount to a Wilcox L4 G24 dovetail mount with a low-profile breakaway base.
Wilcox PVS-14 Dovetail Mount Arm
Wilcox L4 G24 Dovetail Mount With Low-Profile Breakaway Base
The dovetail interface is supposed to be more secure and the Wilcox allows more adjustments than the standard USGI mounts (though, again, for some people, the standard mounts may fit better).
How To Head-Mount Dual PVS-14’s
If you want to run two PVS-14’s as a dual-tube setup then you need a bridge mount. They are available in both dovetail or bayonet style and they vary in price and weight. You probably want the most reasonably priced mount at the lowest weight.
There are a number of bridge mounts on the market, however, they can get expensive (looking at you Wilcox and RQE).
The one I have personal experience with and think is a good mix of performance, lightweight and not too expensive is the bridge mount made by Integrated Components (IC). They make a “quick detach” bridge mount that would allow you to press a button and detach a PVS-14 and a version that is not “quick detach” with no buttons, that’s more lightweight. And then, you also have the choice of a dovemount or bayonet mount). This is the one I chose and recommend:
That said, if I was going to also try and mount a thermal monocular on one eye and a PVS-14 on the other, then I might be looking at the “Standard” quick-detach (and non-lightweight) version of the IC dual PVS-14 mount because you can order it with 1 mounting arm for the PVS-14 and the other mounting arm for FLIR breach.
The Best Night Vision Rifle Gear
The ideal setup for your rifle for night vision use is pictured in the graphic above from Telluric Group, along with their explanation:
“There are two principles we follow when setting up a rifle for use with night vision. First, we MUST be able to access both an IR laser/ illuminator AND a white light – intermittently and on demand. This allows us to A) assess and accurately engage threats and B) respond to situations where light conditions are not in our favor (subjects with flashlights or backlighting). In the domestic US, or in other developed urban areas, we absolutely have to account for the fact that light conditions can change. Second, we need to minimize changes or variations between our ‘day rifle’ and our ‘night rifle’. This applies to grip AND sight picture. To the greatest extent possible, we want to build on the training and experience we’ve gained shooting during the day. We do not want to have to train past the equivalent of training scars. This is especially relevant to the position of the laser on our rifle.“
With that said, the recommended night vision rifle setup, and the one that I’m currently using, is this:
- ATPIAL-C – infrared (IR) aiming laser with IR light (also has visible laser for daytime)
- Surefire Scout M600DF – weapon mounted white light
- Surefire dual pressure switch – for instant switching between laser/IR light and white light.
Let’s talk about each in depth and some other options out there…
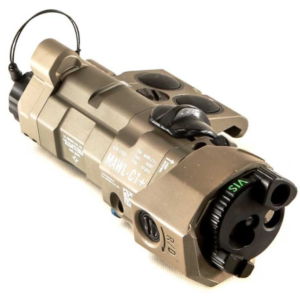
1. The best IR lasers and illuminators
The ATPIAL-C is the civilian version of the military issue AN/PEQ-15. From all accounts, probably the most reliable and rugged of your options. For me, that’s a big deal because IR lasers in general are not the most reliable devices and if I’m going to spend money on an IR laser, I want the most reliable one available. The ATPIAL-C gives you both a laser and IR illumination, along with a red visible laser, all in one package.
The DBAL-D2 is also recommended by Telluric Group. The big difference here is the size of the DBAL-D2, it’s a bit bigger and heavier and that’s mainly because of the illuminator which uses LED’s and is much more powerful than the ATPIAL-C. If you’re mainly going to use your rig for hunting or longer-range engagements (100yds+) then Telluric Group recommends this one because the illuminator is so powerful. There is one downside to the power of the illuminator – if you’re standing directly in front of the unit, you can see the faint red lights that the LED’s emit which could possibly give away your presence.
The DBAL-A3 is also a consideration. This one has both the illumination and IR laser along with a green visible laser. It’s worth noting that a few years ago, various DBAL’s were not as reliable, but from what I hear when Steiner took over the company from Laser Devices, the quality has improved and the general reports from the people I hear using this unit are good.
The B.E. Meyers MAWL-C1+ is the newest of the generally recommended IR lasers. It is also the most expensive. Almost everyone who uses it or sells it says it’s the “best” of the bunch. Because I could buy two ATPIAL-C’s for the price of one MAWL, I will wait to see how the durability of the unit is once it has had more time in the hands of early adopters… but if you want the “new hotness”, then the MAWL is it. It definitely has a LOT of well thought out features and everyone says that it has the most powerful illuminator and lasers by far.
2. The best white lights for rifles
The SureFire M600DF Dual Fuel LED Scout Light is the most powerful white light you can put on your rifle right now because it puts out 1,500 lumens when you use the rechargeable battery option. You can also use two batteries and get slightly less lumens (hence the “dual fuel” name). It’s also backed up by the legendary SureFire reputation for ruggedness and reliability.
Of note, it is the same retail cost as the SureFire M600 Scout light model it replaces, and the weight and size are nearly the exact same as the earlier model so there’s no reason to choose the lower power SureFire M600 Scout when you can get the newer, more powerful M600DF dual fuel model in my opinion.
The Streamlight Protac Rail Mount HL-X was previously the most powerful light available with 1,000 lumens of output…
Streamlight and SureFire are two of the most trusted names in tactical flashlights. SureFire is usually regarded as more durable and they charge a higher price too. The major difference between the Streamlight and SureFire lights recommended here is the Streamlight is much cheaper and comes with a pressure pad switch whereas the SureFire only comes with a button tail cap (you’ll have to pay more money to get a pressure switch, or the dual-pressure switch for the SureFire).
That said, I’ve heard more negative reports about the Streamlight HL-X model here than I’ve ever heard about the Streamlight TLR-1’s or the “original” ProTac Rail Mount 2. Most everyone says Streamlight customer service is good and will fix them for you though.
The cheapest night vision rifle setups
If you’re trying to setup a rifle for NV, but you’re on a budget, then here are some other options for you too that could work…
Keep in mind, you give up some capabilities in return for spending less money, but figure out what your needs are and go from there.
- OTAL-C – Proven IR only laser (no visible laser, no IR illumination)
- Inforce WMLx – can switch between white light AND IR light with the flick of a thumb
Before I got the ATPIAL-C, this was my setup… I used the OTAL-C and to be honest it works pretty well.
The only real downside is that the OTAL-C only has an IR laser and no IR illumination. What you’ll quickly discover is that the laser is so powerful you see a lot of “bloom” and it’s hard to get a precise aiming point without additional IR illumination. And you’ll also probably find that additional IR illumination is just simply helpful in general when working with night vision. That said, you can pretty much overcome both of these problems by using a white light/IR light combo. Surefire makes a few of these types of lights, but you have to twist the head of the light to change from white light to IR which is not very efficient if you need to switch to white light immediately, which is why I like the Inforce WMLx for this role.
The way you run it is that the OTAL-C is only pressure pad activated and you press the pad with your fingers while using your thumb to activate the Inforce WMLx light for additional IR illumination. Simply keep the Inforce in IR mode while using the NV and if you happen to need to switch to white light, it only takes a few seconds to flip the switch to white light and hit the light button again. Again, this is not a bad setup for the price and if you’re hunting, it’s perfectly usable. Another benefit of this setup is it’s pretty lightweight for what it is. And for less than $800 you can have a perfectly usable IR laser and IR light with white light setup.
Here’s another rifle setup you could run, that’s a little cheaper than an ATPIAL-C:
- Surefire X400V IRc – a pistol IR laser with IR illumination made by SureFire
- Inforce WMLx – for your white light.
I never even thought of using the SureFire pistol IR laser/light setup on a rifle, until I saw a video clip from Sergeant Major (ret) John McPhee AKA “The Sheriff of Baghdad”, where he recommended it because the SureFire has great illumination and is less expensive than an ATPIAL-C or DBAL-A3. I don’t have experience running this setup, but looks like it would work well too. My only concern here is that, again, to switch from IR illumination to white light, you would have to reach down and twist the head of the Surefire light – so you would probably want to run an additional, small, white light like the Inforce WMLx along with the Surefire for instant white light if needed.
The best pistol night vision gear.
Again, you have a few options for setting up your pistol for night vision work. Here’s my recommendations:
The best Red Dot Sight (RDS) for your pistol
The Trijicon RMR Type 2 Adjustable LED Reflex Sight – 3.25 MOA is arguably the best choice for a pistol RMR. The type 2 is Trijicon’s improved version for use with pistols. The 3.25 MOA dot is smaller than the 6 MOA dot, allowing for more precise aiming in day/night and you can turn down the intensity for NV use. I’ve also heard of a number of people switching to the 1 MOA dot version as well.
These days there are plenty of other RDS for your pistol, but almost none of the others are as rugged as the Trijicon RMR. The only other one that gets a recommendation for serious hard use at this time is the Leupold Deltapoint Pro:
The Leupold DeltaPoint Pro is a slightly less expensive option to the Trijicon RMR. Some people like this sight more than the Trijicon RMR due to a bigger window, however, because of the design of the window it’s not quite as rugged as the Trijicon from what I’ve seen.
The best tritium night sights for your pistol
Trijicon HD or HD xr Night sights are some of my favorite tritium night sights. I ran them on my EDC Glock 19 since the day I bought it for years. That said, because of the somewhat difficult nature of using 3-dot iron sights with night vision, the I-Dot Tritium Night Sights from Ameriglo are a recommended option.
Ameriglo Glock I-Dot Tritium Night Sights – Model GL-201 – from Ameriglo offer only two dots to line up, one on top of the other, making them easier to use with night vision than a standard 3-dot setup, is what I’ve heard from others who’ve used them for this purpose.
Pistol laser recommendations
I do not have any time personally running a laser, IR or visible on my pistol, but here are the options as I understand it:
Surefire X400 V IRC – with White-Light/Infrared LED + IR Laser
DBAL-PL – Has both a visible white light with visible laser and an IR laser with IR illumination.
The best night vision monoculars, goggles and devices
In the gun world, you will often hear the advice to “buy once, cry once” which means that you’re better off saving your money and purchasing the best gear you can afford, and crying once for spending the money… rather than get the cheap option that’s not going to work for you or break on you and you cry over and over again each time you use it and then have to buy a better version to replace it eventually.
Night vision, is very much that type of purchase. You’re better off saving for the gear you want and getting that…
For example, the performance between Gen 1 and Gen 3 is simply astonishing – so if you’re going to invest any money into it, then you might as well save up and buy the best you can afford…
And even better, these days at least, the gap in price between a high-end unit and a lesser unit is smaller than ever…
For example, I’ve seen a good Gen 2+ PVS-14 on sale for $2,195 recently and a top-of-the line Gen 3 PVS-14 on sale on the same site for $2,995. That’s only an $800 difference. Yes, $800 is a lot of money for most of us, but when you’re talking about already spending $2,000 it’s probably worth it to save just a little longer and pay a little more to get the best tech you can get. You’ll be happier with the performance and you probably won’t ever have to upgrade.
Should you choose green or white phosphor for night vision?
It used to be that all night vision was “green”. That’s how it’s always portrayed in movies too.
But these days, you can also get your night vision tubes using a white phosphor screen instead of green, giving everything a white and black look instead of green tint.
Is white better than green?
The answer seems to be, technically, “Yes”
Is it worth it for you to pay the extra price?
I think that depends.
A public post on various night vision forums online by Tactical Night Vision Company (TNVC) explains it well I think (emphasis mine):
“ … The geniuses at L-3 Warrior Systems developed and patented filmless technology. While we are not at liberty to fully discuss the details on how this is achieved, the gist is that the tube can gather way more light, which is then amplified even more, all while retaining a minimum 10,000 hours powered tube life. Harris(formerly ITT Exelis) also makes WP tubes, but theirs are still thin-filmed. So, while the image is still brighter than a thin-filmed green tube, they will not provide the same brightness levels or resolution as a filmless tube.
White phosphor is an insanely potent technology that provides a clear advantage over green for the warfighter. But, does it make green obsolete? The answer is no. While white does provide a distinct advantage, it is not perfect. The white image can sometimes be too bright in higher light conditions. While these conditions are not the primary operational environment for night vision, they do occur. If you live or work in an urban or suburban area, you will have an abundance of man-made ambient light at night. This amount of light will not always provide you enough illumination to operate safely, so night vision is the answer. But, the over-sensitivity of white + filmless, can sometimes create a glowing halo effect. This is when you want to turn down the gain on your goggle, or use light-limiting objective covers. But overall, green may be a more viable option for these areas of operations. That said, the US SOF community is only purchasing white phosphor night vision right now. They still have green in inventory, but it is being phased out as older goggles are retired.
But again, just because the Navy SEALs are running white phosphor, doesn’t mean it’s what you need. While it certainly has a high “chicks dig it” factor, WP is expensive. You will generally spend $800+ more per WP tube. Yes, there are cheaper WP tubes, but you need to ask yourself why they are cheaper. Without getting into the nitty gritty of tube differences, let’s suffice to say that not all tubes are created equal. Some pass muster at the factory, and others don’t (they are sold at a discount to various dealers to recoup monies spent in production). There are still plenty of SOF units and infantry kids stacking the bodies of jihadists across the globe, through green screen. There is absolutely nothing wrong with green and a lot more bad guys have met their virgins as a result of operators armed with green night vision than white. White is certainly great if you can afford it in your budget. But that is the hinge point of your decision. Does your budget allow for the white upgrade?
Personally, I tell people this: if you need to uncomfortably stretch your budget to afford white, stick with green. Save the extra money for mounts, lasers, helmets, ammo, 401K, etc. Night vision requires a lot of different accessories to work properly. But, if you have the extra money laying around, then get white. Having or not having one or the other willnot be the deciding factor in your mission success. Both white and green are phenomenal technologies that have, and continue to serve our warfighters and LEO’s well.”
So, if you want the latest and greatest, you might want to pay the extra for the white phosphor, but you can certainly use the best green available and get the job done.
For what it’s worth, I have green and don’t feel ill-equipped. That said, if I was splurging on a dual-tube setup in the future because I had extra money, then I would probably just go with White Phosphor because it’s available now.
The Best PVS-14
I recommend and use the Night Vision Devices ITT Pinnacle PVS-14 Gen 3 HP+ Autogated Night Vision Device.
This PVS-14 is produced by Night Vision Devices and comes with a 10-year warranty. That’s a nice benefit when you’re spending this much money. Plus, it uses a real ITT/Exelis Pinnacle Autogated image intensifier tube that is HP+ rated (the highest rating). I’ve got nothing but good things to say about this PVS-14.
NOTE: There are plenty of other PVS-14’s on the market, but I really like the NVD versions because they come with a factory 10-year warranty which I believe is very, very important considering the monetary investment you are putting into this gear.
If you want to upgrade to white phosphor…
The L3 PVS-14 Gen 3 Omni VIII Unfilmed White Phosphor is, as far as I’m aware, the highest performance PVS-14 you can buy right now. It utilizes L3’s unfilmed white phosphor tubes – the same stuff US SOCOM is using now.
The Best Dual-Tube Night Vision Goggles
I don’t yet own any dual-tube night vision goggles, so my opinion at this time is based on research and not “hands on” use, but I’ll share what I’ve found thus far…
The PVS-15 Night Vision Goggles were standard issue night vision goggles for US SOCOM and famous for that. I personally have no experience with these, but they’re definitely a proven option. However, as I understand it, they’re becoming rather dated. And I believe that if you bought them as a civilian they would be overpriced. Instead, the L3 Sentinel Goggles are a popular choice for a dual-tube setup with many great reviews:
The PVS-15 were replaced by the PVS-31’s by US SOCOM. One of the major differences in the two units is that the PVS-31 allows you to independently adjust each of the tubes, meaning that you could move one out of the way and use the goggles as a monocular or use both as a binocular. Unfortunately, the PVS-31 is not for sale to civilians. If you’re looking for PVS-31 night vision goggle functionality, then take a look at the NVD BNVDG Night Vision goggles.
The NVD BNVDG have many of the same features as the PVS-31’s to include the ability to rotate each individual tube up and away from your eyes, allowing you to use them like a monocular or a binocular when needed. And the controls are very similar to a PVS-14.
If I ever decide to purchase a dual-tube night vision setup, then I will probably go with the BNVD’s.
The Best Thermal Devices
I also have limited “hands on” experience with thermal gear, but will share what I do know here…
Of note, I am mostly recommending “monocular” style handheld thermals here, because there are a ton of thermal rifle scopes. From the Prepared Gun Owner paradigm, I think the most likely use case for a thermal device is as a handheld thermal scanning device that you can keep in a pocket on your gear and use to scan, then flip down your night vision to navigate.
The FLIR Scout TK is a pocket-sized thermal monocular that is probably the least expensive thermal device you can get. I have one and it works well. Your detection ranges are probably going to be limited to 100yds or so, maybe more but the resolution is not going to be great at all. Which means, even though you’ll see a heat “blob” – you won’t be able to tell what it is. For under $600 though, this is a good choice for an entry level thermal device to add to your loadout. Leupold also has a similar entry level monocular, that I have no experience with.
The FLIR Breach PTQ136 is a definite step up, yet still affordable entry into the thermal market. It has a LOT of things going for it, and is comparable to price and functionality as a PVS-14 with the exception that it’s not made for weapon mounting.
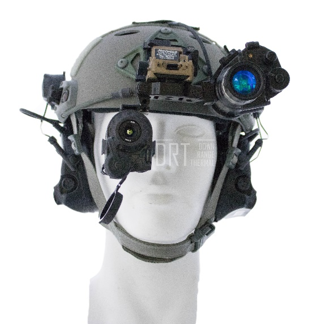
So, besides not being able to weapon mount it, you can use the FLIR Breach as a monocular, holding it in your hand or mount it to your helmet just like a PVS-14. In fact, you could have a PVS-14 night vision over one eye and the FLIR Breach over the other eye if you use something like the IC duall bridge-mount!
In addition to the good resolution and power of the unit, another benefit is that you can run it off batteries or you can connect it to a remote power source. This is a good feature to have because thermals have pretty short battery life.
The Trijicon IR Patrol M300 boasts that it was “designed for military applications and performance at a consumer price”. And that sounds pretty accurate to me. With this thermal unit, you get a name you can trust (Trijicon) and the ability to use the thermal as a handheld monocular, helmet mount it over your eye, and even use it as a standalone weapon sight using the internal digital reticle, OR clip it on in front of your daytime optic as a clip-on unit. It’s definitely on the high-end of price, but you appear to get exactly what you pay for with this product. I personally have no experience with this thermal unit, but it would be a go to choice for me if I was looking for a high-end thermal device.
Conclusion and why you should probably buy night vision sooner than later
At this point, you know everything you need to know to make an informed buying decision and at least get started buying the right night vision gear for what you need…
I’d like to encourage you to not put this off, if you’ve decided you need the capability.
Here’s why…
On the one hand, the longer you wait – in general – the better the consumer market will become and the more options you’ll have available at lower prices… I get that.
On the other hand, there has never been a better time to buy night vision and you might want to buy it NOW, while you still can…
The fact is, there are a ton of things you need to do and buy to be as prepared as possible, and we all have limited time and money.
Which is why you need to do some thinking about what takes priority in your preparations.
For example, before the most recent election, because Hillary Clinton made clear she was very, very anti-gun—specifically semi-autos—it made sense to prioritize buying AR-15’s and standard capacity magazines that had a very good chance of being outlawed by her regime if she had won…
In short, there is less of a chance of a ban on emergency food, water storage, fuel, solar power, generators, or those types of preps any time soon…
But there is a VERY real possibility that things like body armor and military-grade night vision gear will be put on the list of restricted items in the near future…
They could even outright ban them from civilians.
Military-grade night vision gear like we can buy here in America is already illegal to own in many other countries. Some states won’t even allow predator hunting at night with night vision gear. And it’s my understanding California already has regulations against weapon-mounting certain types of night vision devices. There was even a bill in typically gun-friendly West Virginia to ban night vision.
And you better believe that the same tyrants that want to ban guns want to ban night vision too!
They use the same tired arguments that they use to try and take our guns…
To quote the aforementioned Huffington Post piece:
“The federal Bureau of Alcohol, Tobacco, Firearms and Explosives does not regulate the sale or use of night vision equipment, a spokesperson said…
Ladd Everitt, the director of One Pulse for America, a gun violence prevention group, says that should change. Military-style gear like night vision equipment could be used in mass shootings like the one in Las Vegas, he said. (The Vegas shooter himself did not use night vision gear.)
Night vision equipment is “not the tool of sportsmen,” Everitt said. “It’s the tool of people who are seeking to kill as many people as possible in as short amount of time as possible.”
In short, the gun grabbers want to ban night vision too.
So, if night vision capability is something you’ve identified as a need in your preparations, then I would encourage you to get started today.
There truly has never been a better time to buy.


 pt 3 of 3")

By Caleb -, thanks a lot for the post.Really thank you! Much obliged.
You’re welcome!
Comments are closed.